How can I Send Existing Recipients a Double Opt-in (DOI) Mailing? (For Example, a Second DOI for the GDPR)
Important: This feature is only available in the Standard and Pro plans
You can use our software to send a double opt-in (DOI) email to existing contacts. This can be useful if, for example, you want to be extra sure you have a record of all subscribers' consent to receive your mailings. In wake of the General Data Protection Regulation (GDPR), which took effect in May 2018, many companies chose to send a "re-opt-in" to all subscribers for exactly this reason. Another good time to use this feature is if it's been a long time since your subscribers consented to receiving your mailings. Or if you have another reason for wanting to clean up your list. You have the choice of using this function for either the entire contact list or just for specific contacts.

2) Next, create a provisional sign-up form and link it to the DOI email you just created. You will need this sign-up form to activate the DOI mailing. You don't have to display or embed it anywhere.


4.) Important: The system will only send the DOI email to new contacts! This means you now have to delete the contacts you want to send the DOI email to. If you are sending the DOI email to all contacts in your list, you can skip this step and move on to Step 5. If you are sending the DOI email to only selected contacts, then delete those contacts from your contact list now.
5) Go to the button Add Contacts in the upper right-hand corner. Choose File Upload and select the saved CSV from your file folders. A new interface will appear. If you've already deleted the intended recipients of this DOI email from your contact list, then move on to Step 6. If you're sending the DOI email to ALL contacts on your list, then select the option to Clear Contact List Before Importing.
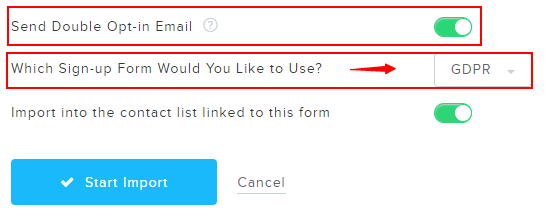
6) In the same interface, switch on the option Send Double Opt-in Email. This interface also allows you to assign the sign-up form to multiple contact lists. Under the option Which Sign-up Form Would You Like to Use, you have two possible selections:
- Current Contact List = This assigns the contacts to the list you are working in ONLY.
- All Contact Lists Linked to Sign-up Form = Once your contacts re-confirm their double opt-in, they will be added to ALL contact lists stored in this form. You can always change the sign-up form later if you need to. If you do, you'll have to confirm the selection All Contact Lists Linked to Sign-up Form again.
7) Click Start Import to finish the process. This will send out your DOI email to all "new" contacts – i.e., all the contacts you've just deleted and reimported. Your contacts will now all show up under Active Contacts once they have opted-in for a second time. If they do NOT respond to your double opt-in, they will be deleted from our system within 7 days, as per our GDPR-compliant standard.